In addition to collecting dust a good miter saw station needs level cutoff supports on both sides of the saw.
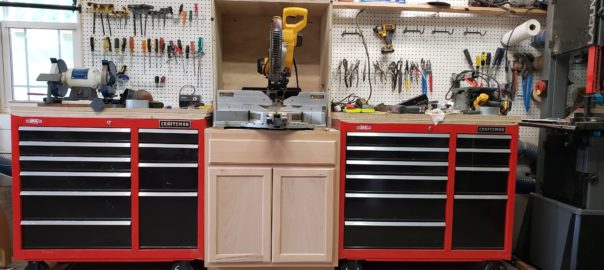
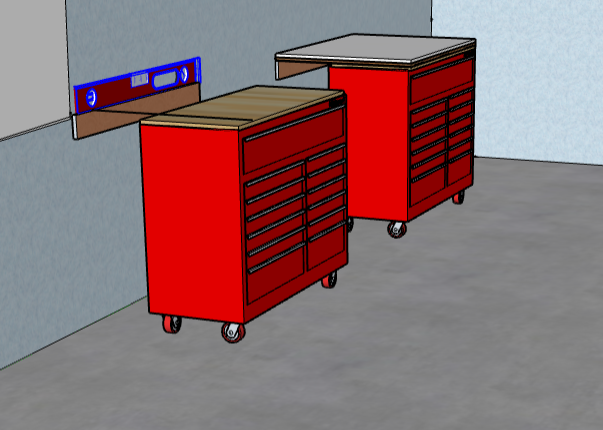
“With a few modifications to the tops of my two metal tool cabinets, they made excellent cutoff supports. Since I already owned them, using them for the cutoff supports saved me a lot of space in the shop.
Regarding the miter saw’s dust collection, apart from my lathe, the miter saw is the messiest tool in my shop. It throws sawdust and woodchips everywhere, and the dust port it comes with actually makes things worse. This dust port is attached behind the saw blade, but it is too small to handle the large volume of dust and woodchips created by the saw. As a result, a lot of this waste bounces off into the air.
A better solution is to remove the dust port that is attached to the saw and contain the dust in a larger hood surrounding the back of the miter saw. These plans will help you build a similar hood for your miter saw using plywood or melamine boards and a few fittings. The plans will also show you how to set up tool cabinets for cut-off supports.”
Supplies:
- 2 Tool cabinets
- 1 standard 32-inch kitchen base cabinet. (optional)
- 2 sheets of 4X8, 3/4-inch melamine boards. (3 sheets if you are building the base cabinet)
- 1 4-inch dust port (available at Rockler or Woodcraft)
- Leveling casters
Directions:
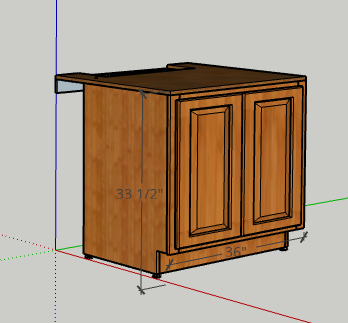
Step One:

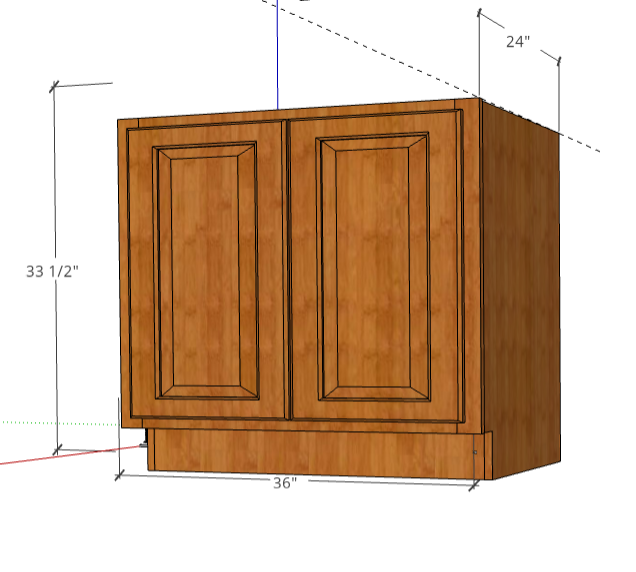
Use the optional plans at the end of this article to construct the miter saw base cabinet.
As an alternative, use a 36-inch base cabinet from Home Depot or Lowes. These cabinets are likely less expensive then building one yourself with plywood and they work fine.
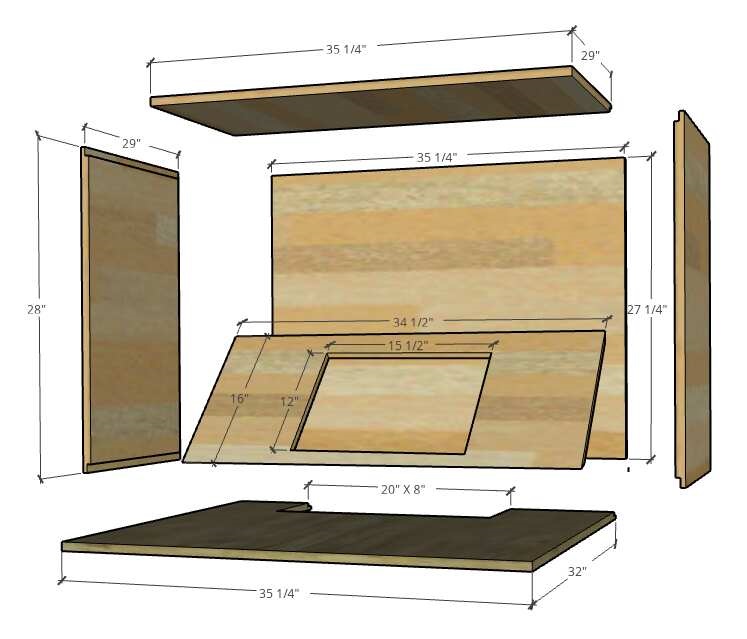
Step Two:
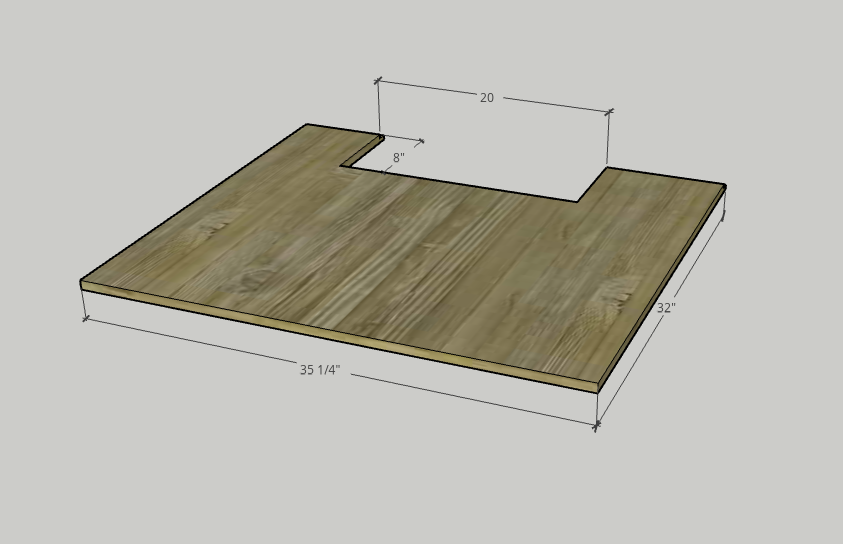
Use the following dimensions to make the top for the base. Use 3/4-inch melamine or 3/4-inch plywood.
Step Three:
- Attach leveling feet to the miter saw’s base cabinet then use wood screws to attach the top it.
- Next set the cabinet in its final location and use the leveling feet or wedges level everything.
- Once everything is level, attach the top of the cabinet to the back wall using a 2X4 as shown here to prevent the cabinet from moving.
Step Four:
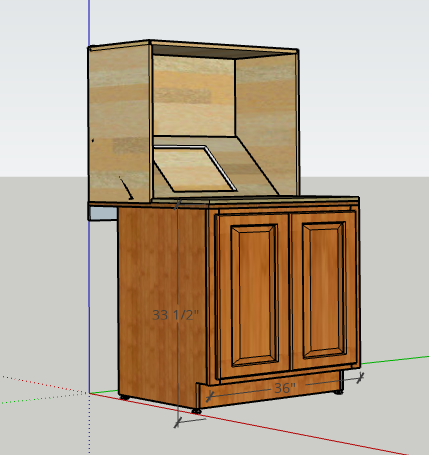
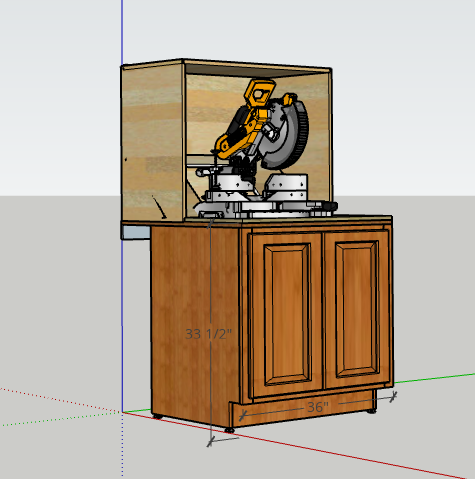
- Use the plans provided below to construct the miter saw dust shield shown here and set it on top of the cabinet.
- Make sure that the of the cabinet is screwes to the wall before the dust hood is placed on top. This is necessary to prevent the cabinet from moving or tipping over.
- Insert the 4-inch dust collection hood (available at Rockler) into dust shield and attach it to a 4-inch flexible dust hose leading to the dust collector.

The PSI Woodworking Dust Hood. Works with a 4-inch port to connect to any dust collection system. This hood is available at Amazon, Rockler, Woodcraft and other woodworking tool suppliers.
Step Five, Puting The Miter Saw Station Together
Set the miter saw into the dust shield.

- Replace the cabinet wheels with leveling casters. (optional)
- Top each cabinet with a 3/4″ X 41″ X 27″ sheet of melamine then roll them into place. Do not screw the melamine tops to the cabinet at this point.
- Level the toolbox using the leveling casters or wedges under the standard casters.
- Adjust the height of each top so that it is level with the cutting surface of the miter saw. In my case, I needed to add a few strips of 3/4″ plywood under each melamine top.
- To level the cabinets with the cutting surface of the saw may also require a few shims under the saw.
- It is also again necessary to support the tops of each tool cabinet with a 2X4 screwed to the wall in the same manner as the base cabinet.
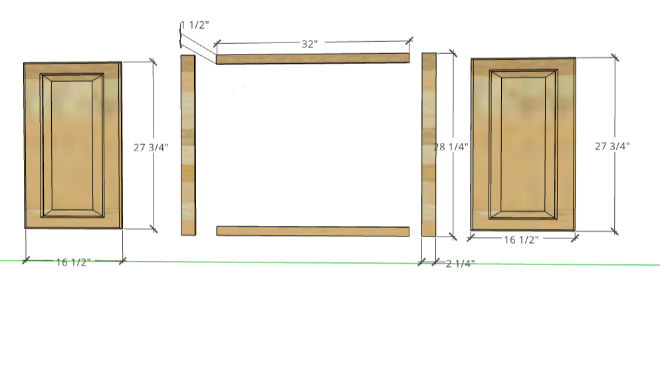
Miter Saw Base Cabinet Plans
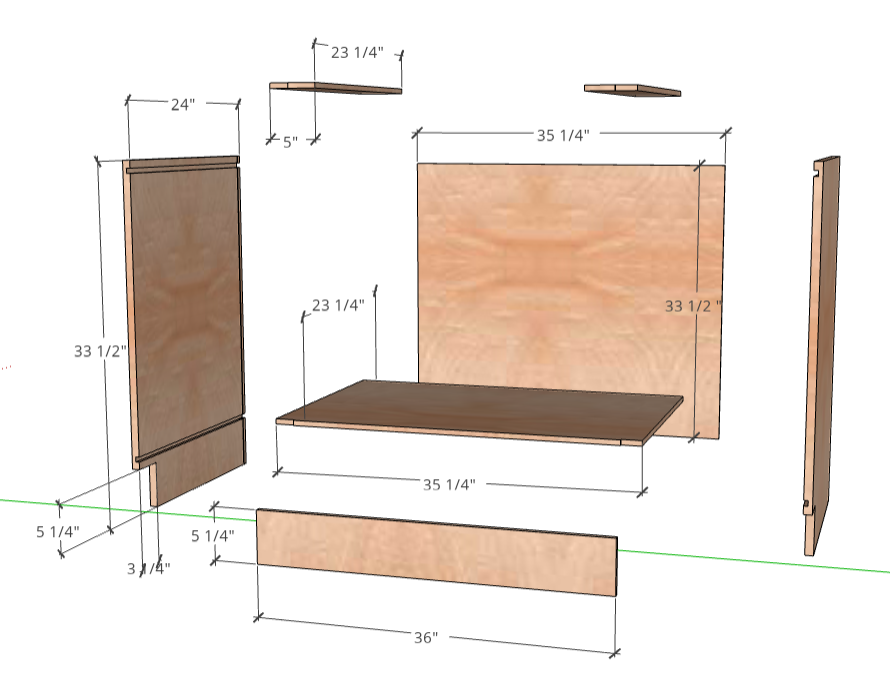
Cabinet Top

Miter Saw Station Dust Hood Plan
Some Final Thoughts
The Most Effective Miter Saw Stations Use 4-Inch Vacuum Hose Connected to the Shop’s Dust Collector.
In my previous miter saw station I attached the 4-inch vacuum hose to a dust hood mounted on the bottom of the box just behind the saw. The problem I found with this design is larger wood scraps often fell into the port clogging it. It is better to mount the dust port at a 45-degree angle to prevent large scraps from falling into it.
Most of the plans for dust hoods found on YouTube, blogs and other internet sites; are all basically the similar. The differences are usually found with how the dust is collected. Many of these dust hood plans use the 2-inch hose from a shop Vacuum or dust extractor connected to a dust port inside the dust hood. Don’t waste your time with this plan; it is not effective.
Other plans also attempt additional protection by attaching a dust extractor to the saw’s built-in dust port. The idea being that with the combination of the dust extractor and the dust-collector there will be less dust escaping into the room. However, as I mentioned before, I found that this 2-inch port is nothing more than an obstruction that blocks a lot of dust from entering the dust hood. I suggest that it is better to completely remove this built-in port from the saw so that there is less dust bouncing off of it to be thrown around the shop.
The Final Touch
Tack rubber drawer matting across the front of the dust shield to help contain the dust. Using rubber for this makes it easy to change the cutting angles of the miter saw without removing fronts made from wood.
Additional Shop Dust Control Articles:
Response To My Beautiful Death. (Read about the dangers of wood dust)
Improve Dust Collection Part One, (identifing the problems).
Improving Your Shop’s Dust Collection.
Improved Dust Masks. (Choosing the Right Mask)
