Here you will find a table with the free woodturning plans and all of the calculations for this Chevron Vase.
These woodturning plans use the segmented woodturning technique. If you are not familiar with segmented woodturning or wish to make changes to this design, then I recommend that you take a few minutes and watch this video from Lloyd Johnson. Lloyd demonstrates how plans for a vase like this Chevron Vase are made using a program; WoodturnerPro. (For full disclosure, I recommend WoodturnerPro but I do not accept any commissions from sales of WoodturnerPro.
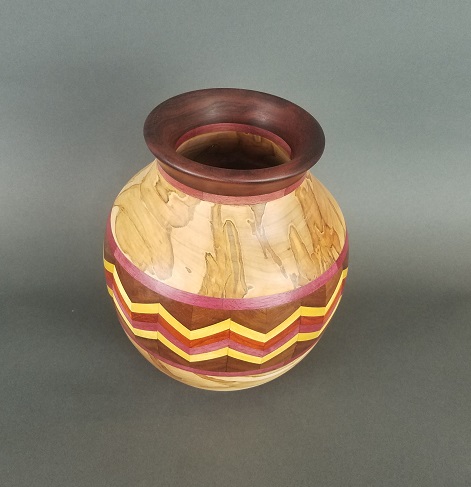
Just Follow These Six Steps to Make Your Own Chevron Vase:

Step One: Choose Your woods:
This is a list of the woods used in this vase.
Spalted Maple from North America.
Padauk: The red colored wood. It is from Africa.
Yellowheart: The Yellow colored wood. It too from Africa.
Purpleheart: The purple wood. It is from South America
Wenge: This is the dark brown wood on the rim the base and the feature ring. It is also from Africa.
Step Two: The Feature Ring, Cutting Summary.
Cut each of the following strips of wood 1-1/4 inches wide and 40 inches long. (I used Wenge, yellowheart, padauk, and purpleheart for this vase.)
- Strip 1: 1″ Wenge.jpg,
- Strip 2: 1/2″ Yellowheart.jpg,
- Strip 3: 1/2″ Padauk.jpg,
- Strip 4: 1/2″ Purpleheart.jpg,
- Strip 5: 1/2″ Yellowheart.jpg,
- Strip 6: 1″ Wenge.jpg
Step Three: The Feature Ring, Glue Up.
- Run strips 2,3,4 and 5 through a belt sander to trim them down to 3/8″ thick.
- Trim strips 1 and 6 to 3/8″ thick.
- Glue all 6 strips of wood together to make one board.
Step Four: The Feature Ring. Assembly.
- Now make one-inch cuts across the layers in the new board at 45 degrees as shown in white.
- Next, flip every other strip left-to-right and glue two pieces together to make 12 chevron units like the ones seen here.
- Square off the top and bottom of each of the 12 chevrons. and trim the sides trimmed at 15 degrees to make the needed 12 feature ring segments.
- Now glue the segments together to make the feature ring.
Make your own feature rings designs with Lamination Pro
Step Five: Compound Miter Cutting Summery
- Your next step is to make the rest of the rings needed for the vase.
- Use the cutting angle calculations from the following table for layers 3 and 7. These are compound miter cuts, so I suggest using a compound miter for the best results.
- Cut and glue the rest of the rings according to the measurements in the table below.
Make your own segmented designs with http://woodturnerpro.com/
| Row | Type | Segs. | Board Thick | Diameter (A) | Diameter (B) | Segment Edge Length | Vertical Spacer Width | Board Width | Economy Board Length | Miter Angle | Blade Tilt | Slope |
|---|---|---|---|---|---|---|---|---|---|---|---|---|
| 9 | Walnut | 12 | 0.75 | 5.19 | 2.97 | 1.39 | 0 | 1.16 | 14.01 | 15 | ||
| 8 | Purpleheart | 12 | 0.38 | 4.91 | 2.5 | 1.31 | 0 | 1.25 | 12.85 | 15 | ||
| 7 | Spalted Maple | 12 | 1 | 5.5 | 9 | 2.41 | 0 | 3.48 | 24.53 | 11.6 | 9.58 | 40 |
| 6 | Purpleheart | 12 | 0.38 | 9 | 6 | 2.41 | 0 | 1.6 | 24.97 | 15 | ||
| 5 | Feature Ring | 12 | 2.38 | 9 | 6.5 | 2.41 | 0 | 1.36 | 25.68 | 15 | ||
| 4 | Purpleheart | 12 | 0.38 | 9 | 6 | 2.41 | 0 | 1.6 | 24.97 | 15 | ||
| 3 | Spalted Maple | 12 | 1 | 9 | 6 | 2.41 | 0 | 3.15 | 25.27 | 11.6 | 9.58 | 40 |
| 2 | Flat Purpleheart | 12 | 0.38 | 6 | 2.25 | 1.61 | 0 | 1.91 | 14.4 | 15 | ||
| 1 | Walnut | 0.5 | 6 |
Step Six: Turn and Finish the Vase
- Turn the vase on a wood lathe at about 1700 rpm to cut it into it’s final form.
- Sand to 400 grit.
- Use Danish Oil for the finish and polished with Carnauba Wax.
Click here for additional free project ideas.

Oh wow ! so nice !!